To enable X++ debugging in the current user session in Microsoft Dynamics AX 4.0, follow these steps:
1. On the server that is running Internet Information Services (IIS), open a console session (also known as session 0). To use Terminal Server to do this, click Start, click Run, type mstsc /console in the Open box, and then click OK. Then, start Microsoft Dynamics AX 4.0 in the Terminal Server session.
2. Set the .NET Business Connector configuration and the client configuration to enable breakpoints when you run the Business Connector. To do this, follow these steps:
a. Click Start, click Run, type Control admintools, and then click OK.
b. Double-click Microsoft Dynamics AX Configuration Utility.
c. In the Configuration target list, click Business Connector (Non-interactive use only).
d. On the Developer tab, click to select the Enable user breakpoints to debug code running in the business connector check box and the Enable global breakpoints to debug code running in the business connector check box.
e. Click Apply. Then, click OK.Repeat step a through step e for the local client configuration in the Configuration target list.
3.Enable debug mode. To do this, follow these steps:
a.On the Tools menu, click Options.
b.Click the Development tab.
c. In the Debug mode box, click When Breakpoint.
d. Click Apply, and then close the Options dialog box.
4.Locate the code that you want to debug. Before the code that you want to debug, type the keyword breakpoint.
5.Manually start the debugger. To do this, click Tools, point to Development tools, and then click Debugger.
6.Enable desktop interaction for the World Wide Web Publishing Service. To do this, follow these steps:
a. Click Start, point to All Programs, point to Administrative Tools, and then click Services.
b. Right-click World Wide Web Publishing Service, and then click Properties.
c. Click the Log On tab.
d. Click to select the Allow service to interact with desktop check box.
e. Click OK to close the World Wide Web Publishing Service (Local Service) dialog box.
7. Make sure that the user who is logged on to the computer is one of the following users:
•The user who is running the Web application pool
•The user who starts a session in Microsoft Dynamics AX 4.0
•The user who set up breakpoints in Microsoft Dynamics AX 4.0
Tuesday, October 30, 2007
Friday, October 26, 2007
Consignment Stock
Consignment Stock is one of the functionality for which we need to customize Dynamics AX. I'm working on such a requirement right now. Some key terms in Consignment business which I have come across:
A. Consignment Stock: Consignment stock by definition is a marketing arrangement whereby physical control of merchandise but not title, is transferred from one business (the Consignor) to another (the Consignee). The title to the goods or ownership remains that of the consignor until the goods are sold by the consignee.
B. Consignor: The consignor is person/vendor/business/supplier who sends the stock.
C. Consignee: The consignee is the person/customer who receives the stock.
D. Consignment Fill-Up: A consignment fill-up does not completely represent a real physical sale of goods to a customer. When you ship consignment stock to the customer, you record the transaction by creating a consignment fill-up order. The transaction is not relevant for pricing since the consignment stock remains the property of your company.
E. Consignment Pick-Up: The customer can return goods that are not required or sold to the central warehouse. They are posted directly into unrestricted stock.
F. Consignment Issue: At regular intervals, the customer reports either how many articles they have sold, or how many articles are in their current stock (inventory). When the goods issue is posted, the transfer from consignment stock is carried out. The article is no longer the property of the company. The relevant accounting and controlling documents are generated.
G. Consignment Return: Consignment returns are used for when your customer wants to return goods to the consignment stock. The transaction is relevant for billing. In this case, the customer receives a credit memo for the returned goods.
Thursday, October 25, 2007
Wednesday, October 17, 2007
Dynamics Ax 4.0 on Windows Server 2008 Beta
Just now finished installing Dynamics Axapta 4.0SP1 on Windows Server 2008. It's cool :-)


A. Windows Server 2008 Desktop - This is how it looks! The glass-shaped Recycle bin, Control Panel all look pretty jazzy.

B. This is how the Windows Explorer looks.

C. Now let's get into business. Installing Dynamics Axapta 4.0SP1.

D. Installation of AX Complete.

Tuesday, October 16, 2007
SQL Server 2005 on Windows Server 2008 Codenamed "LongHorn"
Just downloaded a VPC (Virtual PC Image) of Windows Server 2008 and Installed SQL Server 2005 on it. Windows Server 2008 codenamed "Longhorn" looks pretty cool and interesting. I will upload some snapshots soon, next goal is to go for Dynamics Ax 4.0 installation on it. Wish me good luck :-)
Monday, October 15, 2007
MSMQ Exchange with AX
MSMQ Adapter in Dynamics Ax helps to receive from and send messages to queues. (A Brief on installation steps - Refer Administration Help for a detailed setup of MSMQ)
Install and configure MSMQ
1. Install MSMQ on a Windows Server 2003 computer.
2. Create a queue. A queue for inbound messages can be either private or public; a queue for outbound messages must be public.
3. Configure the queue for sending or receiving documents.
Install and configure the MSMQ adapter
1. Configure global settings.
2. Create the local endpoint.
3. Create the adapter.
4. Create the channel. The channel associates the adapter with an MSMQ queue.
5. Enable the actions.
6. Create the endpoint. The endpoint is the external entity that participates in the document exchange in addition to the local endpoint.
7. Create the endpoint action policy. This step associates an endpoint with an action.
8. Create the endpoint action data policy.
9. Configure the AIF services.
Demo:
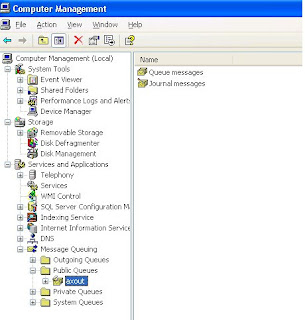
A. Create a public queue - AXOUT
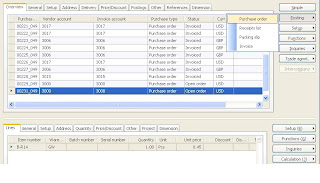
B. Create a purchase order in Axapta and post it as Purchase Order.
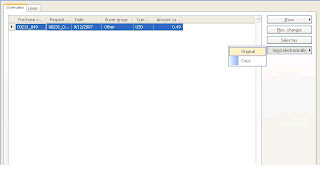
C. Go to Inquiries->Purchase Order and Send an electronic copy. An XML of the Purchase Order is generated and the AIF Framework sends it to MSMQ Adapter.
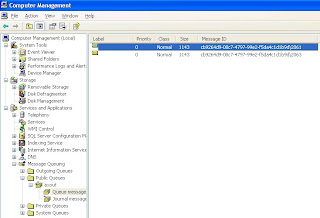
D. Purchase Order Document is transferred to MSMQ queue – AXOUT.
Install and configure MSMQ
1. Install MSMQ on a Windows Server 2003 computer.
2. Create a queue. A queue for inbound messages can be either private or public; a queue for outbound messages must be public.
3. Configure the queue for sending or receiving documents.
Install and configure the MSMQ adapter
1. Configure global settings.
2. Create the local endpoint.
3. Create the adapter.
4. Create the channel. The channel associates the adapter with an MSMQ queue.
5. Enable the actions.
6. Create the endpoint. The endpoint is the external entity that participates in the document exchange in addition to the local endpoint.
7. Create the endpoint action policy. This step associates an endpoint with an action.
8. Create the endpoint action data policy.
9. Configure the AIF services.
Demo:
A. Create a public queue - AXOUT

B. Create a purchase order in Axapta and post it as Purchase Order.

C. Go to Inquiries->Purchase Order and Send an electronic copy. An XML of the Purchase Order is generated and the AIF Framework sends it to MSMQ Adapter.

D. Purchase Order Document is transferred to MSMQ queue – AXOUT.

Wednesday, October 10, 2007
Dynamics AX Communicating with Dynamics CRM using Custom .Net Assembly
This demonstration shows data transfer from Dynamics AX to CRM. A Custom .NET assembly is called from AX using CLRInterop which in turn calls .NET CRM Web Services to help the transfer process.
A. Create a customer in Dynamics AX. Key in Details like address, zip code etc.


B. Update CRM button invokes .NET Assembly which is referenced in AX AOT (Application Object Tree)

C. CRMAccount Assembly references CRM Web Service to transfer the data to CRM.

D. Click the "Update CRM" button. It will display the message "Corresponding Account Created in CRM". 
E. Open CRM and navigate to the created customer (i.e. Account) and it's details. 
Monday, October 8, 2007
Start/Stop AOS Service through batch job
A simple batch job can help you to do such type of maintenance work like starting and shutting AOS Service. Please see the code snippet below:
@SET AOSNAME=Dynamics Server$02-DynamicsAxNTSDev
net stop "%AOSNAME%"
net start "%AOSNAME%"
pause
Note: Replace the AOSName with the AOSService name of your installation.
@SET AOSNAME=Dynamics Server$02-DynamicsAxNTSDev
net stop "%AOSNAME%"
net start "%AOSNAME%"
pause
Note: Replace the AOSName with the AOSService name of your installation.
Thursday, October 4, 2007
Dynamics AX Command-Line Parameters
- Opening Dynamics Ax From Command-Line
Ax32.exe (Using this AX client executable we can open an Ax Session directly from the command-line.)
- Extending the command-line by importing an Ax Object (Class)
Here, we will import a class (.xpo) directly without any user intervention.
- Create a xml import file definition e.g. AutoImportClass.xml
<?xml version="1.0" encoding="utf-8" ?>
<AxaptaAutoRun version="4.0" logFile="AxaptaAutoRun_ClassImport.log">
<XpoImport file="Cust.xpo" />
</AxaptaAutoRun>
- We will pass this xml file as parameter to the ax32.exe command.
ax32.exe -StartupCmd=AutoRun_F:\MyDocs\AutoImportClass.xml
Subscribe to:
Posts (Atom)